
When you think of indoor bike trainers, TechnoGym isn’t a company that comes to mind. The company has been around since 1983 and they specialize in gym equipment. You’ve probably seen their machines at your local gym. They are well-known for their weight machines, spinning bikes, treadmills and more. Millions of people use their equipment on a daily basis.
However, TechnoGym is no stranger to cycling and bike trainers. They created the SPINTRAINER in the 1990s. It was a cutting-edge product at that time and used by many professional cyclists.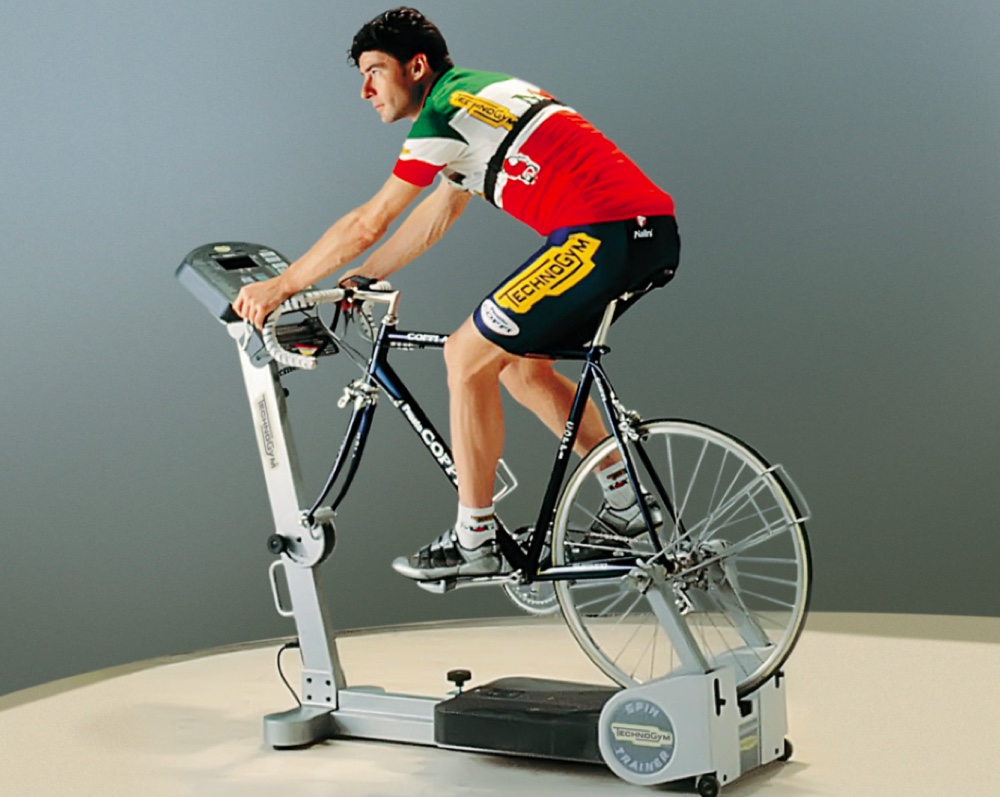
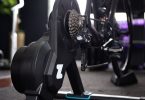
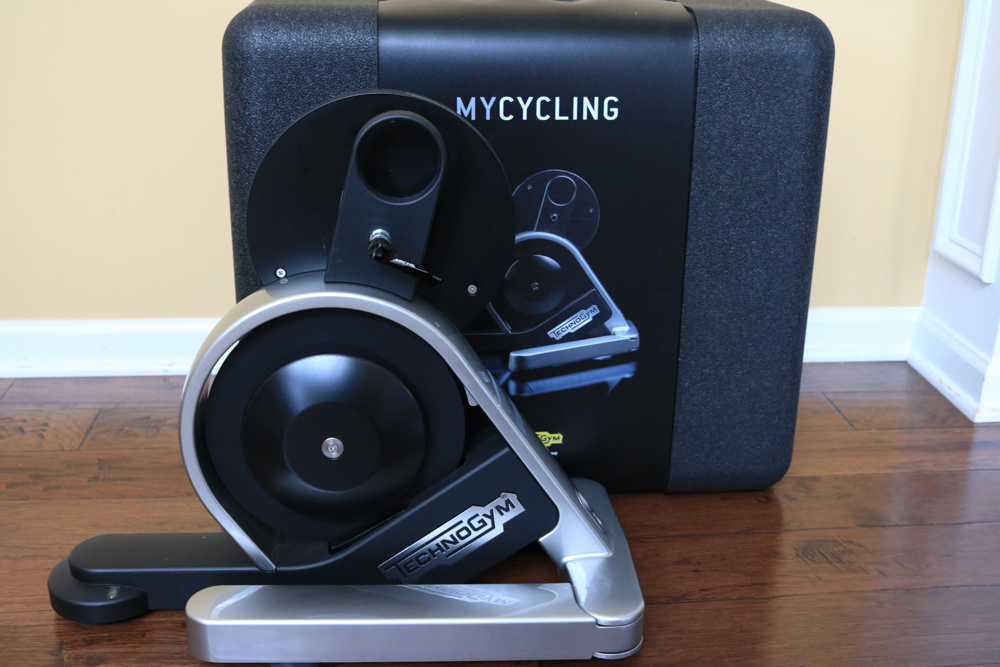
27 years later, TechnoGym introduced the MyCycling smart indoor bike trainer. I have been riding the trainer for the past few months. There are a lot of things I like about this trainer and some other things the company needs to really consider and re-evaluate if they want to be in this business. But before I dig into all of that, let’s go over the specs and how the trainer performed during my rides.
QUICK MYCYCLING HIGHLIGHTS
- PRICE: $2,150
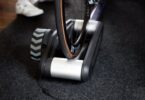
- DESIGN: MyCycling is a beautifully designed trainer. The trainer is encased in a glossy die-cast aluminum. It’s weight just under 40lbs and only 22.4″ x 11″ when legs are folded or 22.4″ x 32.7″ when open. It’s very easy to store and transport and it comes with a black polystyrene carry case. The patent-pending Quick Lock system makes folding and unfolding the legs quick and easy.
- BIKE COMPATIBILITY: MyCycling is compatible with most road and TT bikes. It’s compatible with 130mm/135mm quick release hubs and 142mm thru axle. 148mm is available with special spacers.
- CASSETTE COMPATIBILITY: MyCycling comes with an 11-speed cassette installed (12-24). It is compatible with Campagnolo/SRAM/Shimano 10 or 11-speed cassettes.
- CONNECTIONS: MyCycling is ANT+ and Bluetooth compatible. It will ONLY work with TechnoGym MyCycling training app and Zwift using Bluetooth only. You can read more about Zwift compatibility here.
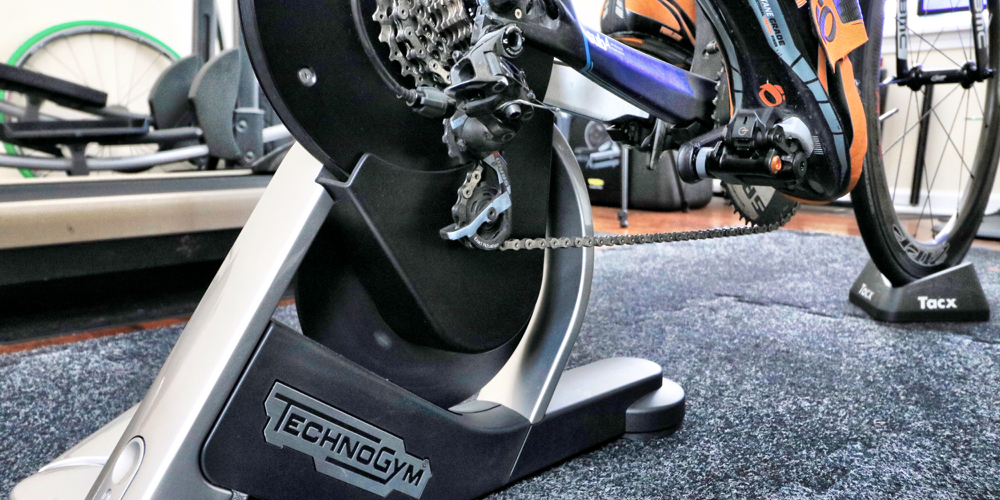
- NOISE LEVEL: MyCycling is advertised as a quiet trainer but I found it to be a little noisy. It uses a tooth belt drive similar to the Wahoo KICKR and it produces a similar type of noise. I didn’t notice any vibration even at higher speed.
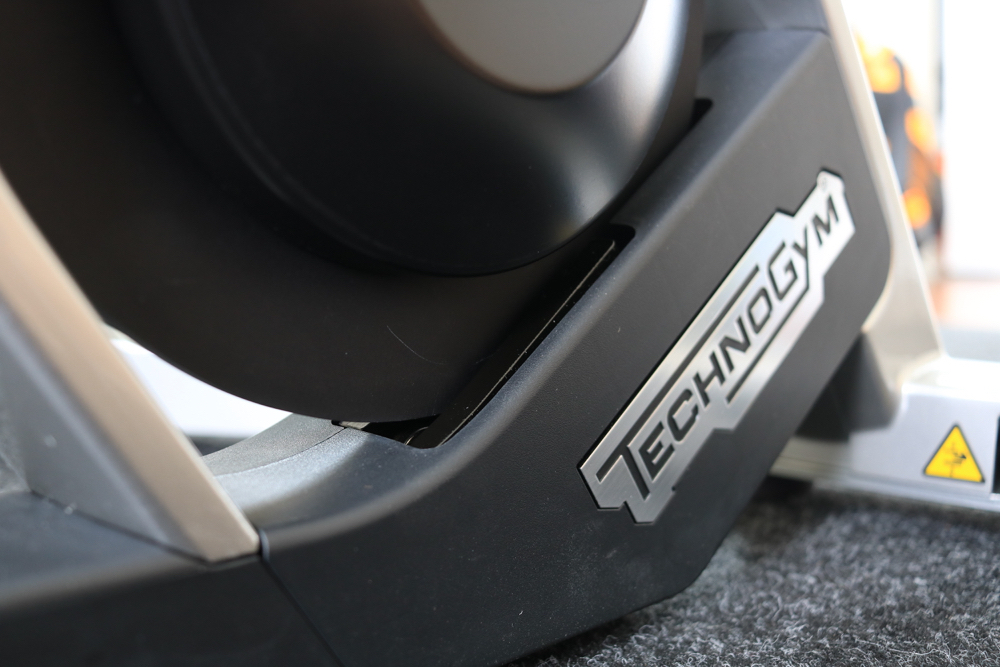
- ROAD FEEL: MyCycling combines direct drive technology with an electromechanical brake. It’s equipped with a 5kg (11 lbs) flywheel.
- ACCURACY: TechnoGym claims +/- 1% accuracy and a maximum of 2100 watts with 20% maximum slope. It broadcasts watts and cadence data and single pedal analysis.
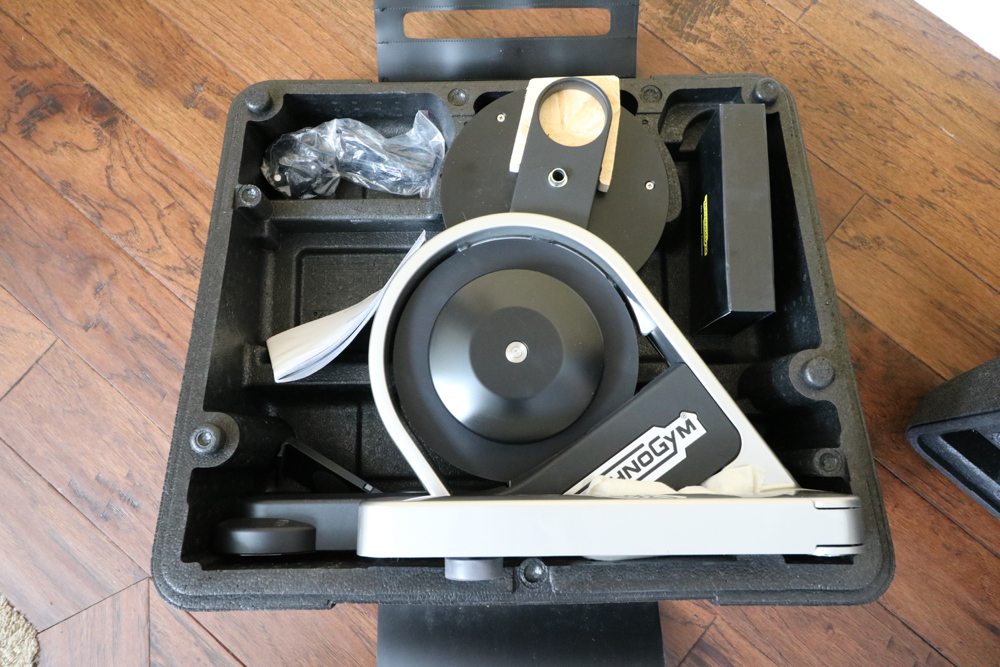
WHAT’S IN THE BOX
MyCycling comes packed in a black polystyrene carry case. The trainer is tucked in nicely inside the case along with the power cord, manual, quick release skewer, and 130mm – 142mm hub adapters.
What’s inside the case:
- MyCycling Trainer with 11-speed cassette installed
- Power code
- Skewer and rear axle adapters for 130mm, 135mm, and 142mm thru axle adapter.
- Phone holder and handle bar mount.
The power cord, quick release skewer, and all hub adapters are included inside a nice looking box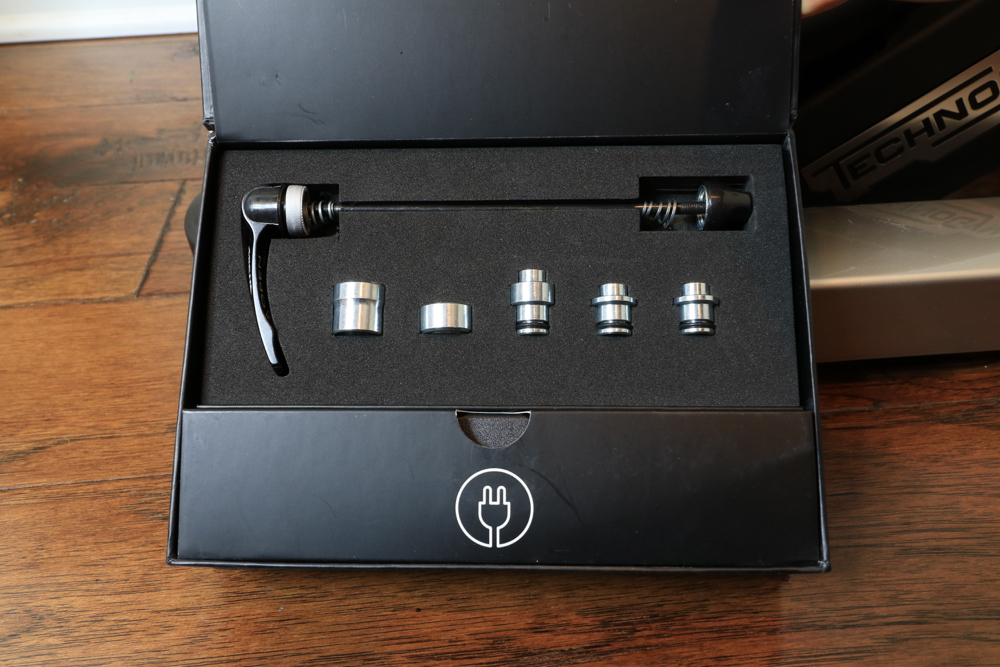
If you are not sure which hub width your bike has, these are the typical width of modern frames:
- Road and TT bikes: 130mm
- Mountain bikes: 135mm
- Single tracks, MTB bikes: 142mm
If you are unsure or have an older bike, you can measure the hub width yourself, remove the rear wheel and measure the distance between the inner surfaces of the rear dropouts.
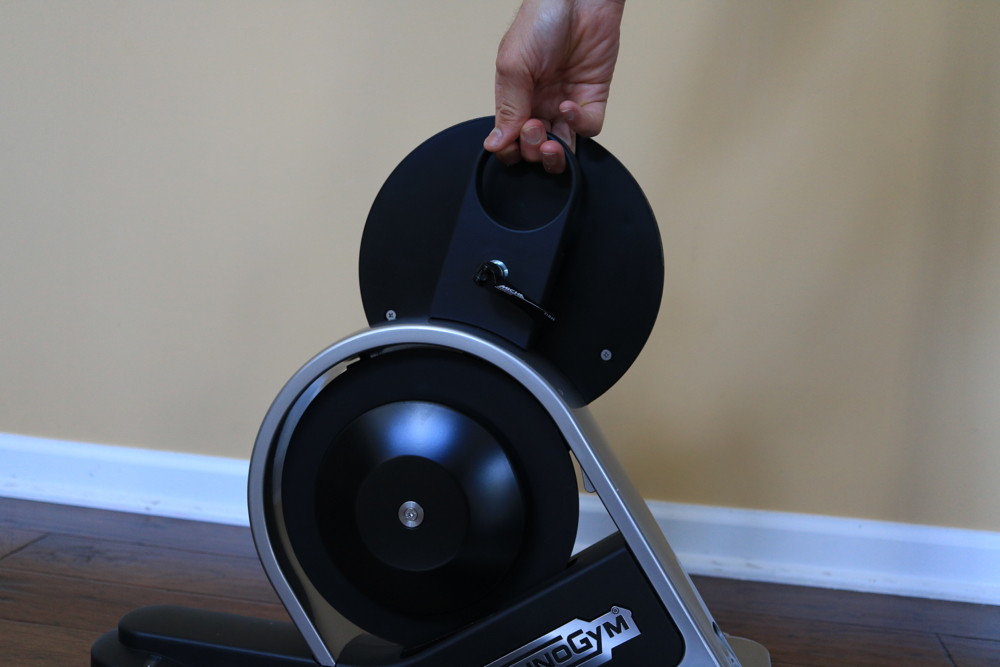
The trainer has a carrying handle placed right on top of the flywheel. Made carrying the 40lbs trainer and moving it around much easier.
To open the legs, press the quick lock button placed on the back of the trainer.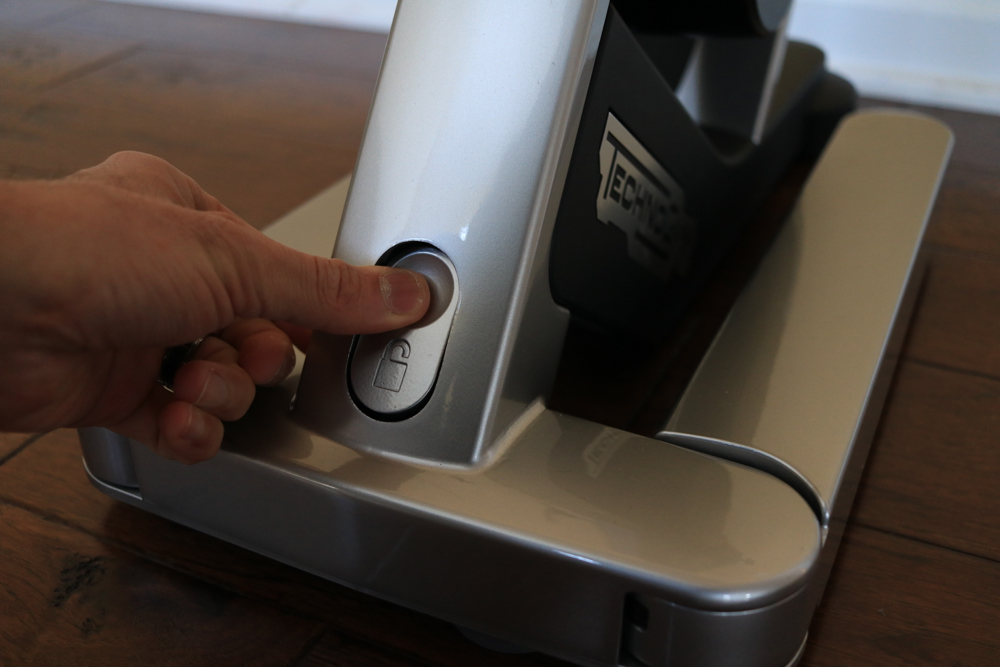
As you open one leg, the other leg will move with it until you hear a click from the quick lock button.
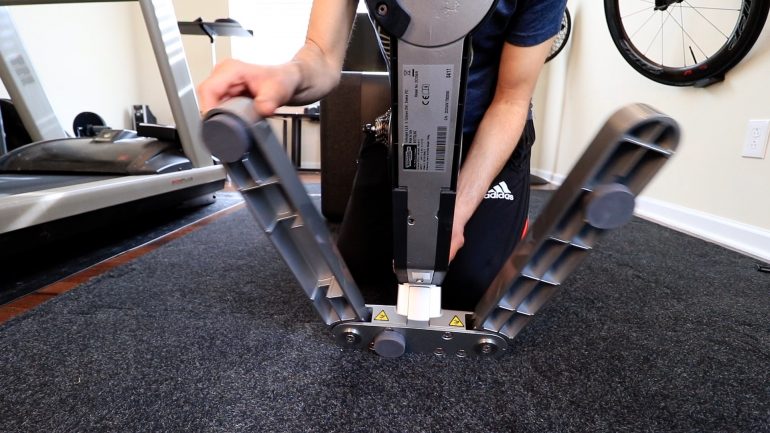
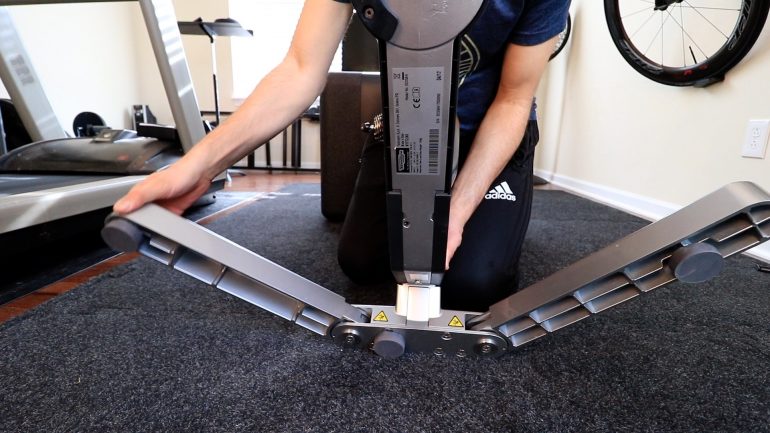
You will find rubber leg caps under the legs for adjustments on an uneven floor
SMART CONNECTIONS & COMPATIBILITY
MyCycling is Bluetooth 4.0 and ANT+ compatible. Currently, there is no ANT+ FE-C compatibility – meaning, the trainer can’t be controlled using 3rd party apps or devices such as Garmin Edge or ELEMNT bike computers. You will have to use TechnoGym MyCycling app to control the trainer.
MyCycling will pair with other devices as a power meter via ANT+ and will send power data only – it will not send cadence data. Just like you see in the image below, I was able to pair it with my Garmin Edge 520 as a power meter. However, you will have no control over the trainer’s resistance.

The trainer needs to be plugged into a power outlet to function. Once it’s plugged in, you will hear the electromagnetic brake engage. The trainer doesn’t have any lights to indicate that’s it on or ready to pair.
If you don’t plug the trainer into a power source, the trainer works as a dumb trainer and provides minimal resistance. You won’t be able to pair it to any device or get see power or cadence data. You will need to shift your bike gears to increase or decrease resistance but you won’t be able to generate much power out of it without it being plugged in. It will be perfect for an easy ride or a pre-race warm up.
ZWIFT COMPATIBILITY
Currently, MyCycling trainer is only compatible with Zwift using Bluetooth. The trainer can broadcast in ANT+ but it’s not ANT+ FE-C compatible. Zwift or any other app won’t be able to control the trainer’s resistance if you are using ANT+. It will broadcast power data only and you won’t experience gradient changes or workout in ERG mode. You will have to manually adjust resistance using the MyCycling app or by changing gears.
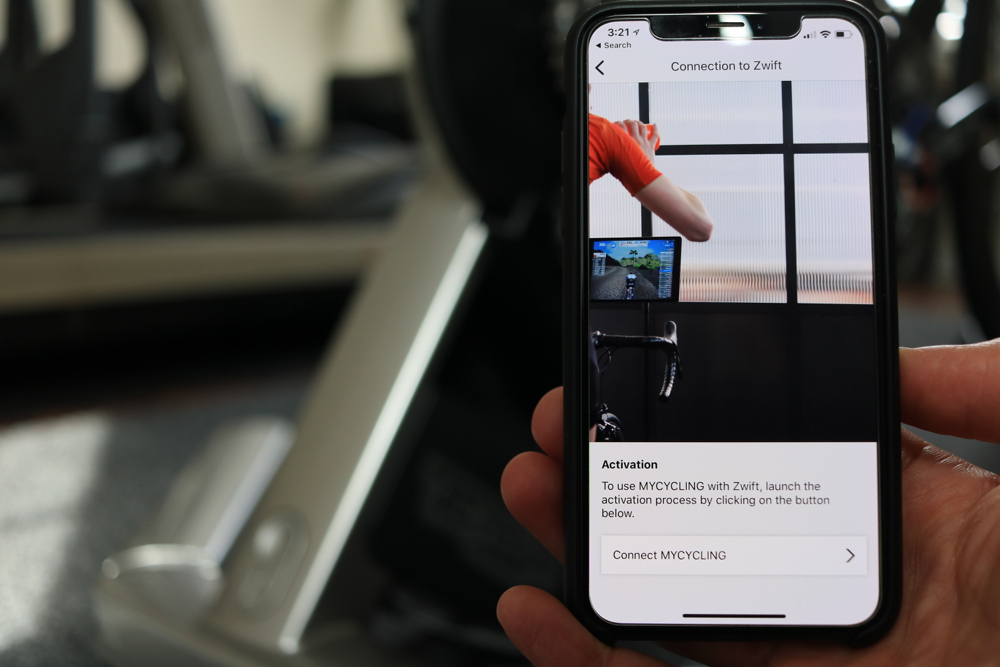
To connect the trainer to Zwift, follow these instructions:
- Download TechnoGym MyCycling training app from iTunes or Google Play.
- Open MyCycling App and pair your trainer (Profile > Settings > Connected Devices).
- Make sure you have the latest firmware. You can update the firmware in Profile > Settings > Firmware Update
- In settings, click on Zwift and follow the simple instructions to make the trainer compatible with Zwift.
Keep in mind you only need to do this once. Once the trainer is unlocked, you can go to Zwift and pair it just like you do with any other smart trainer.
ROAD FEEL
MyCycling combines direct drive technology with an electromechanical brake. It’s equipped with a 5kg (11 lbs) flywheel. Road feel felt really good. However, you won’t experience the long coasting when going downhills like you might do with trainers with bigger flywheel such as Wahoo KICKR, CycleOps Hammer or Tacx NEO.
In ERG mode, I never ran into issues reaching low watts (wattage floor) during recoveries even using the biggest gear.
In Zwift, the trainer responded well to changes in gradients and had no problems with steep climbs.
WHEEL CIRCUMFERENCE AND SPEED
I continue to say speed doesn’t matter when training indoors, but I know many of you will ask for it so here it is: to read the correct speed, you must set the wheel circumference to 2233mm. Remember that the speed reading on your bike computer is correct only if you use the ‘SLOPE’ function. If you use the ‘POWER’ or ‘ERG MODE’ function, the speed data will be correct only in the MYCYCLING App or Zwift and not on your Garmin.
POWER ACCURACY
Did I mention that I added another power meter to my testing arsenal? I got my hands on new P1 dual-sided pedals and was excited to put them to test. First, I wanted to make sure my crank-based Power2Max and P1 Pedals matched, and thankfully they were. I was afraid to see a big discrepancy. However, they were within 1% of each other.
Even though I did my first ride without calibrating the trainer and numbers were spot on, there is a calibration option in the MyCycling app. I would run the calibration after your first ride or after a good warm up.
CALIBRATE MYCYCLING TRAINER
- Open MyCycling App and pair your trainer (Profile > Settings > Connected Devices).
- Make sure you have the latest firmware. You can update the firmware in Profile > Settings > Firmware Update.
- Go to Profile > Settings > MyCycling Calibration and follow the instructions.
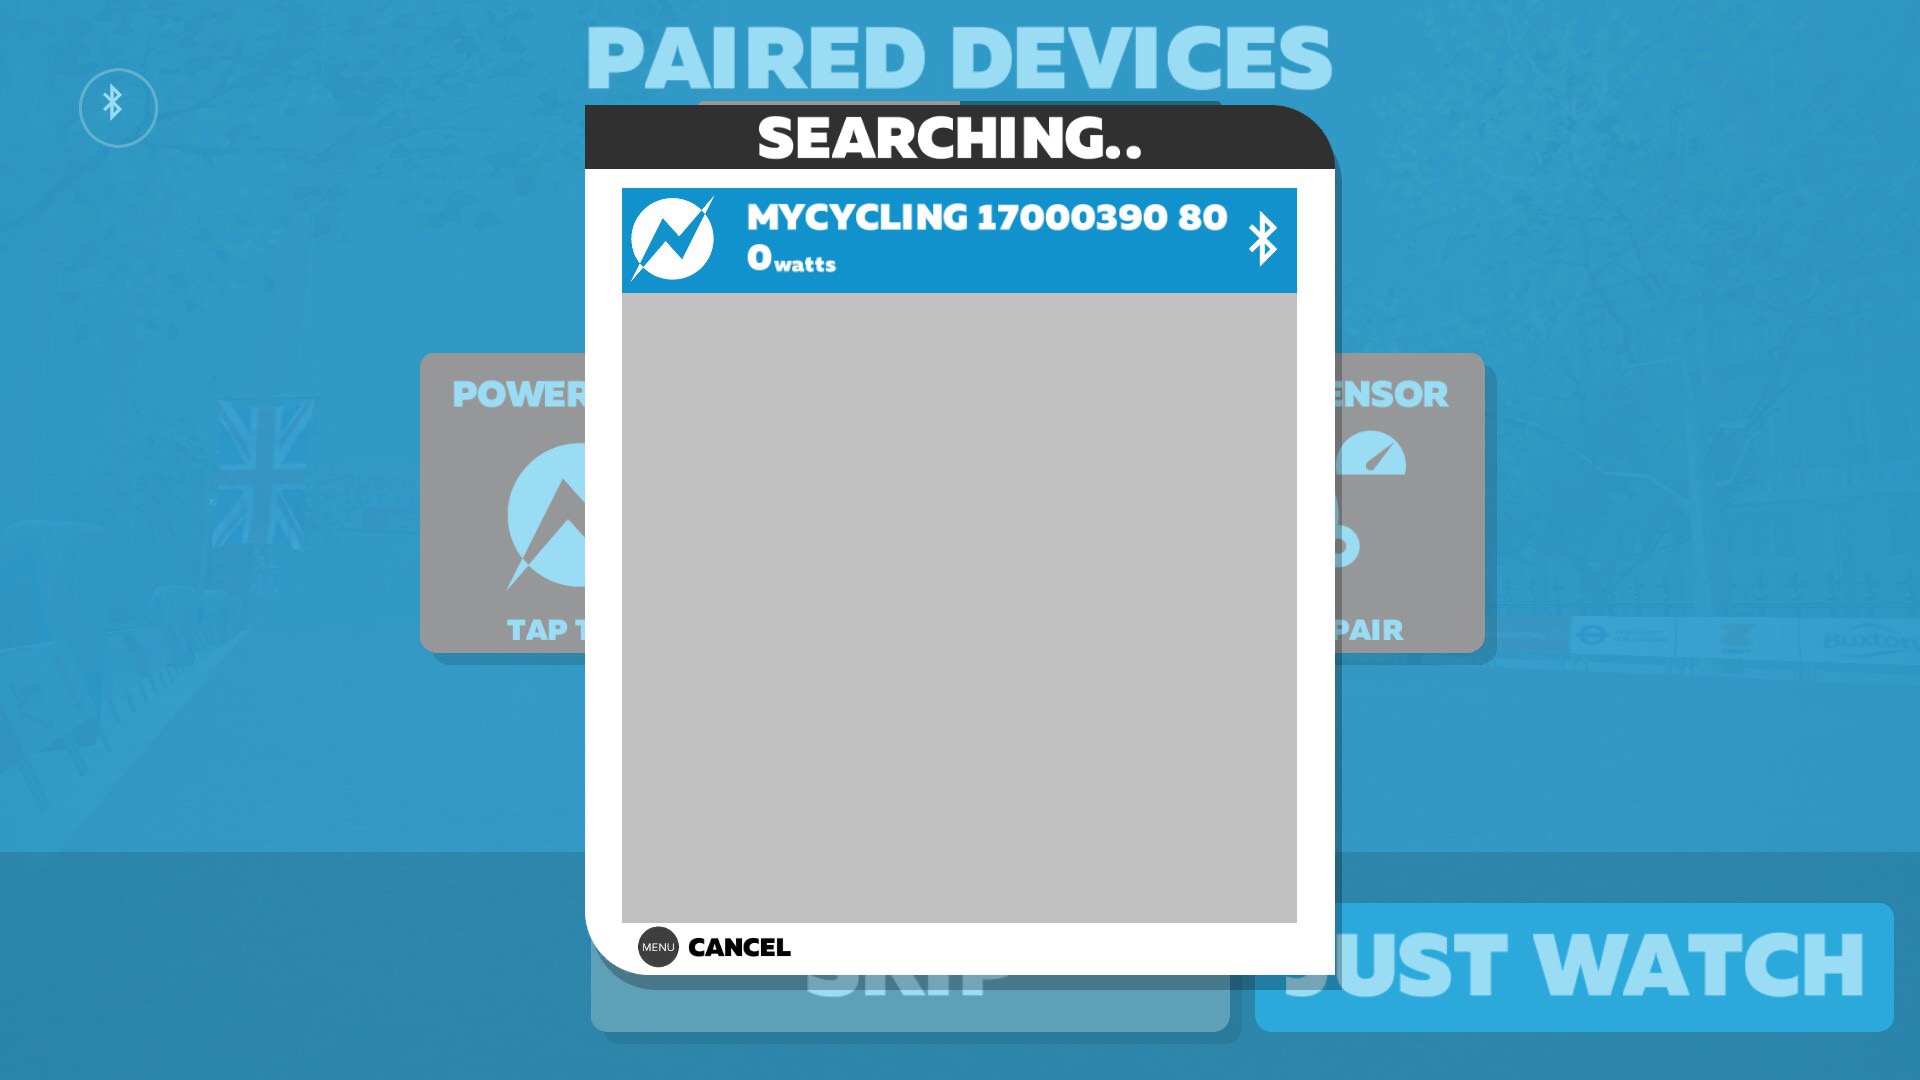
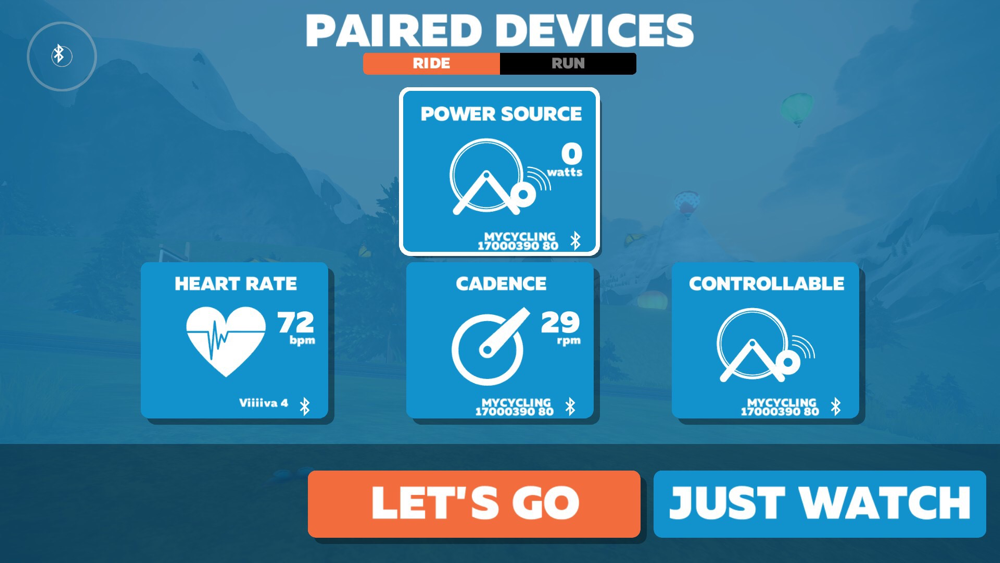
I put MyCycling against my Power2Max, and P1 Pedals and went for a ride around Zwift. The trainer paired without any problem with my Apple TV power source, cadence, and controllable.
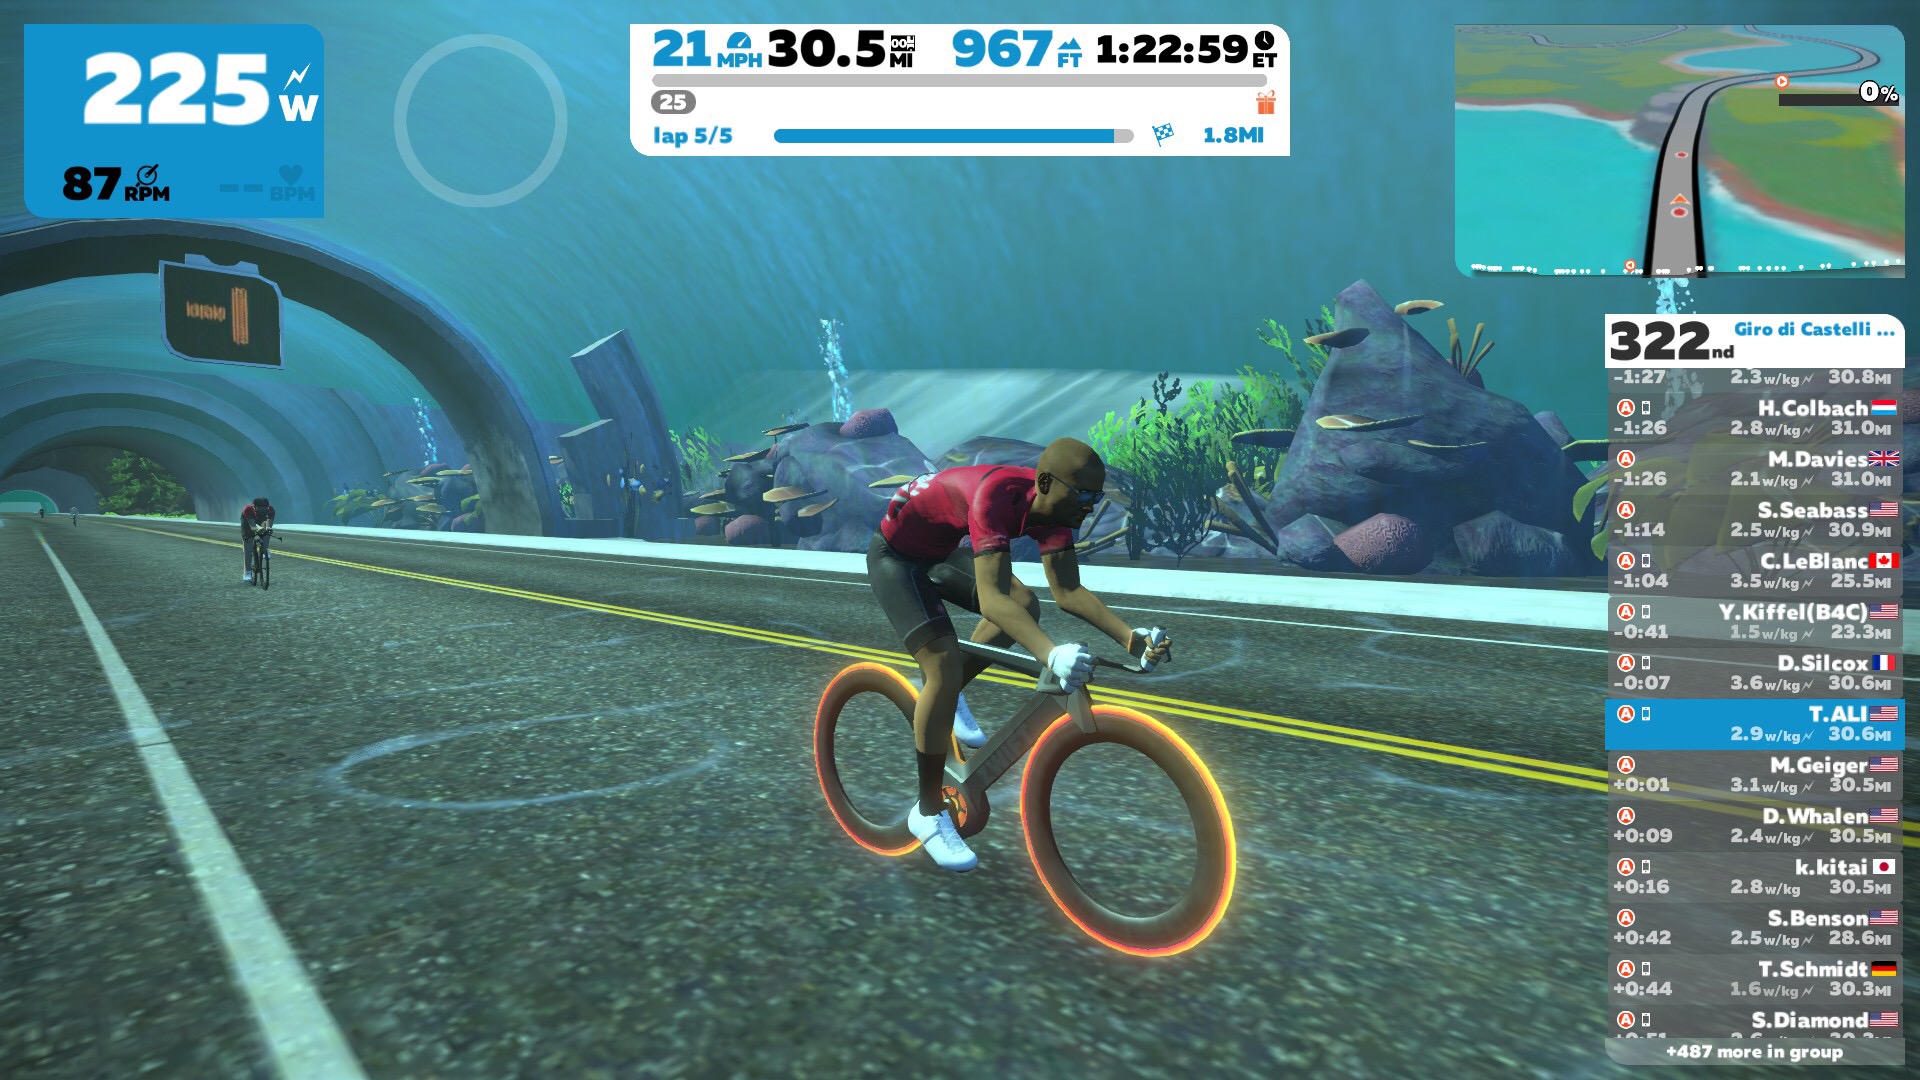
And off we go for a ride on my Tron bike
And here is my power profile for the ride. This ride only includes my P1 pedals as I had some issues with my Power2max file. As you see, both MyCycling and my power meter tracked almost perfectly.
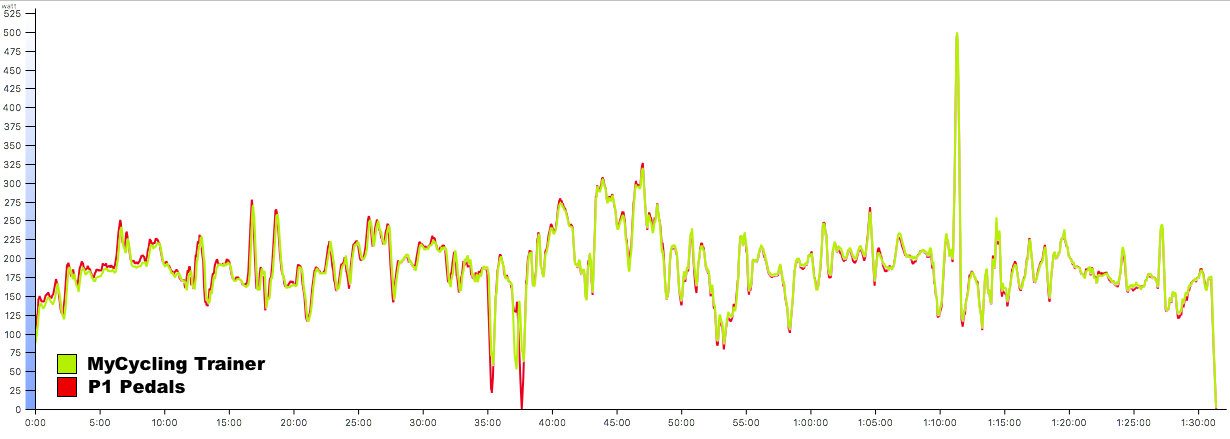
Here is a closer look at a short sprint section. I actually had to take another look at the files to make sure I am not comparing data from the same power meter.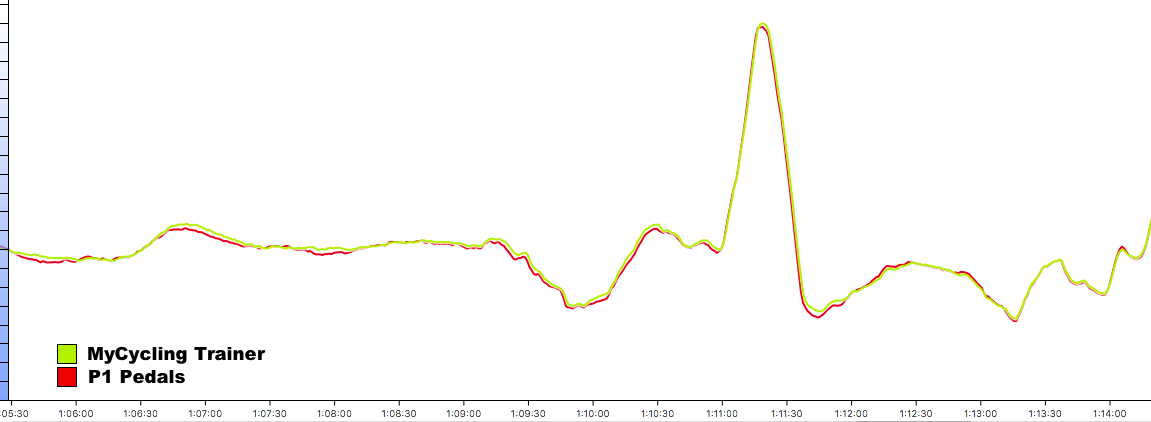
ERG MODE
As I am building for my triathlon season, most of my rides have been more structured. So I spent a lot more time in ERG mode than free-riding on Zwift. But I got you a lot of data as well.
Here is an over/under ride. As you see, all three powermeters tracked very well and were within few watts of each other. However, looking at the recovery intervals – I was spinning at around 100 watts – MyCycling was above the rest.
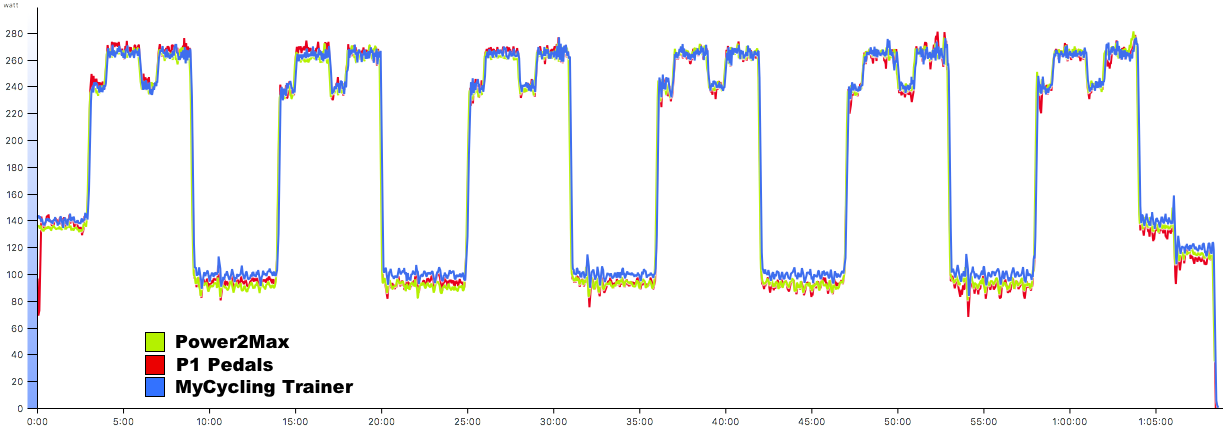 Here is another 4x8minutes intervals close to my threshold. Again similar trend. As you see, the power was very close and matched well with both my P1 pedals and Power2Max. MyCycling was a little higer during the rest intervals and was little higer toward the end after my last interval and during my cool down.
Here is the power numbers from the 4 x 8 minutes intervals:
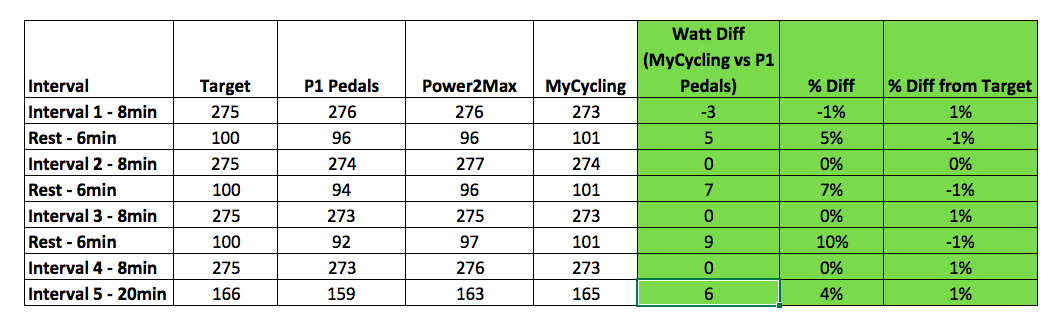
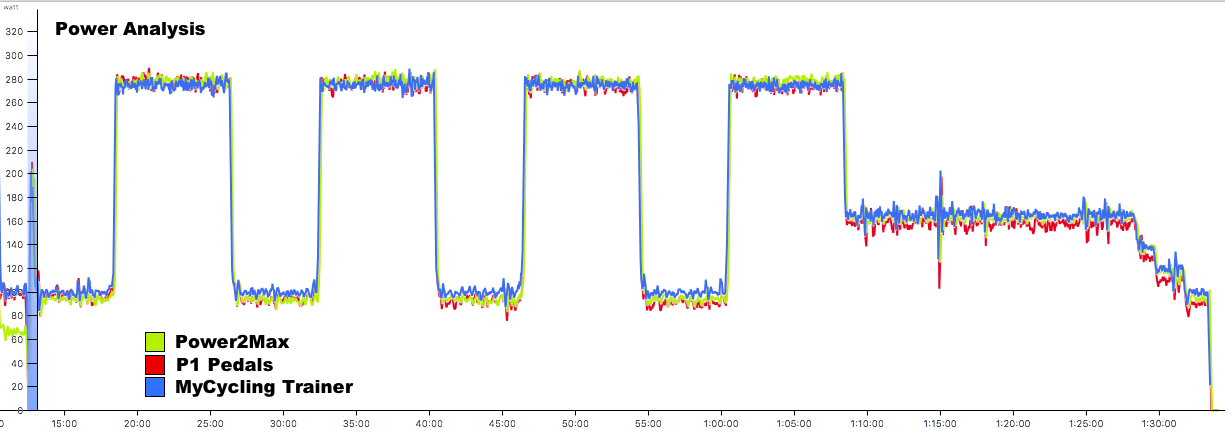
As you see from the table above, MyCycling was with +/-1 % from my target watts. When comparing it to my P1 pedals, it was spot on during the 8-minute intervals and was only off by 3 watts during the first 8-minutes. When comparing it to my Power2Max, it was still within 1% which is very good and that’s what you would expect when comparing different powermeters.
In the last 20-minutes section, it was off by 4% when comparing to my P1 pedals but only 2 watts off or 1% from my Power2Max.
Overall, MyCycling matched TechnoGym’s accuracy claims during my tests and I was able to use it as my power source during all my rides and not having to worry about it reading too high or too low.
Oh, and I only calibrated the trainer once right after I took it out of the box.
CADENCE
MyCycling broadcasts cadence out of the box. Most smart trainers are starting to do that and I think it’s becoming more important than before since the introduction of Zwift on Apple TV. With the Bluetooth limitation on Apple TV, it’s nice to be able to use one Bluetooth signal to pair as a power source, cadence, and a controllable trainer. Currently, all mid to higher end direct drive trainers can estimate and broadcast cadence. The only exception is the Wahoo KICKR. You have to install a separate cadence sensor which is included when you purchase a KICKR.
Most trainers are good at estimating cadence but you might see the occasional spikes from time to time.
However, since MyCycling trainer uses a sensor, cadence readings were spot on. I went through all the data I collected and not a single abnormality. The only thing I noticed is it didn’t respond to coasting as fast as my P1 pedals did as you see in this graph:
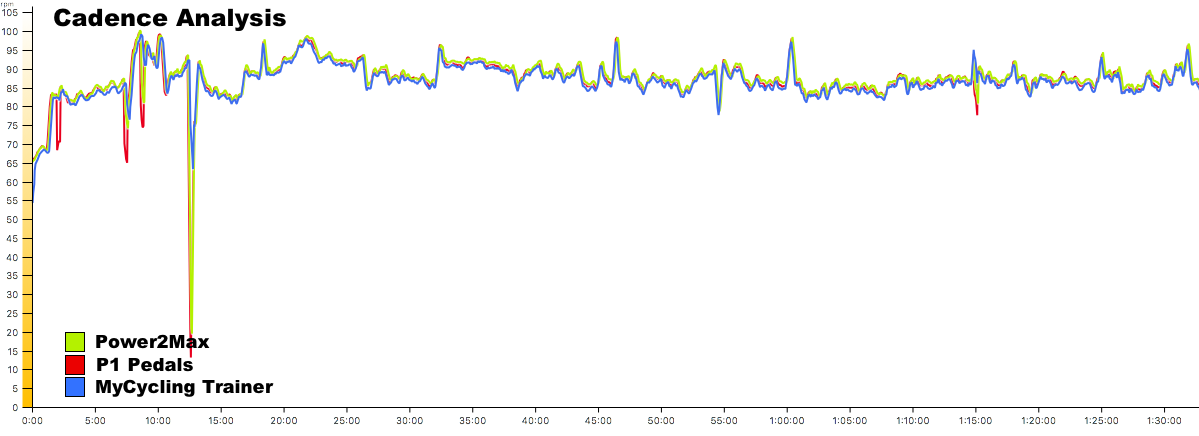
Here is a deeper look at my sudden increase in cadence as I was getting ready to enter an interval in ERG mode. As you see, all three tracked my cadence together without any spikes.

And here is another graph from a hilly Zwift race I did. You can see how both my Power2Max and MyCycling tracked almost identical throughout the full race and the constant changes in my cadence during climbs and decents.

LEFT/RIGHT POWER ANALYSIS
MyCycling provides some form of Left/Right power analysis. You can only see this using the MyCycling app. There was no way for me to export right/left power data to do any analysis on it.
As you see below, this is the extent of the right/left power you will see.
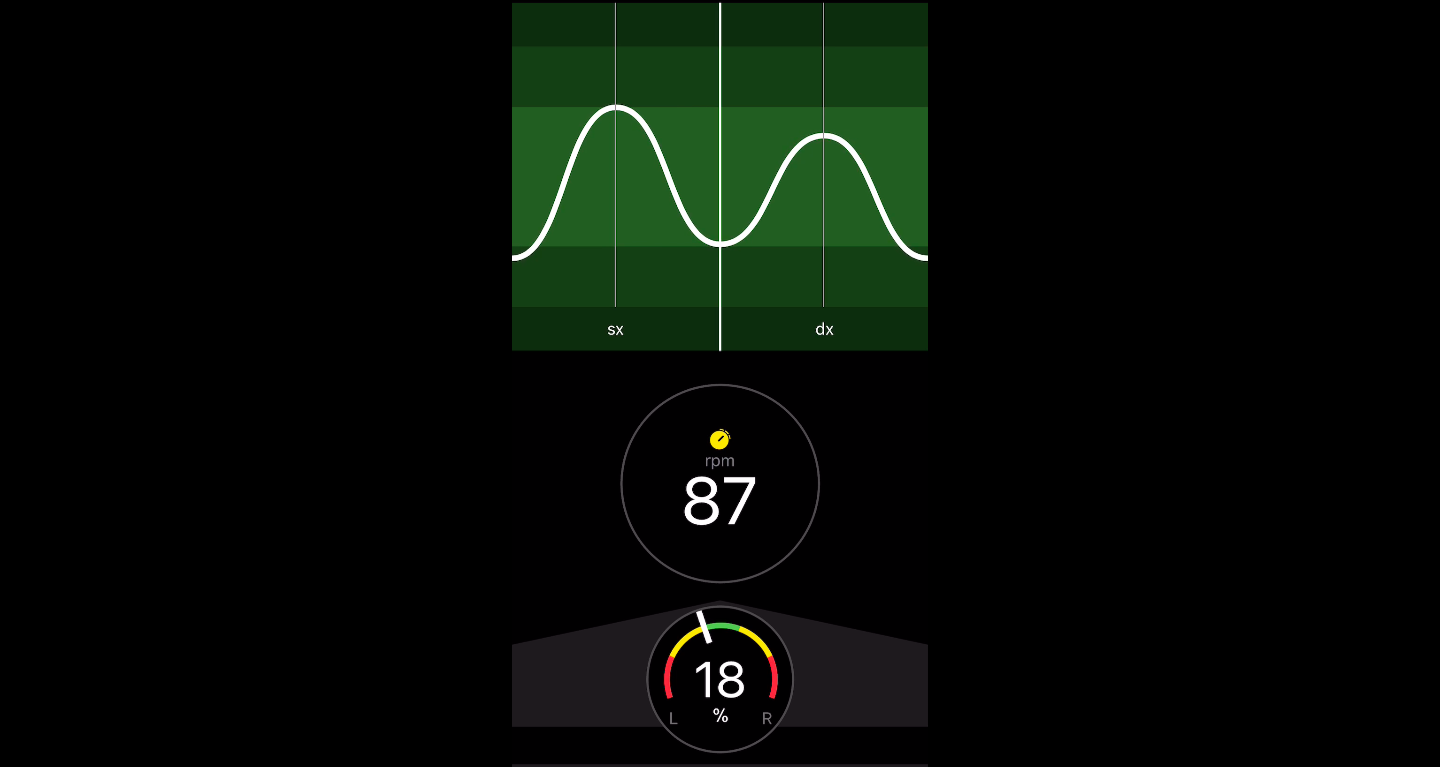
You will see a little sensor on the front left of the trainer. This optical sensor checks the pushing symmetry between the right and left leg while also recording your cadence. The app provides you with a real-time feedback on the circularity and symmetry of your pedaling.

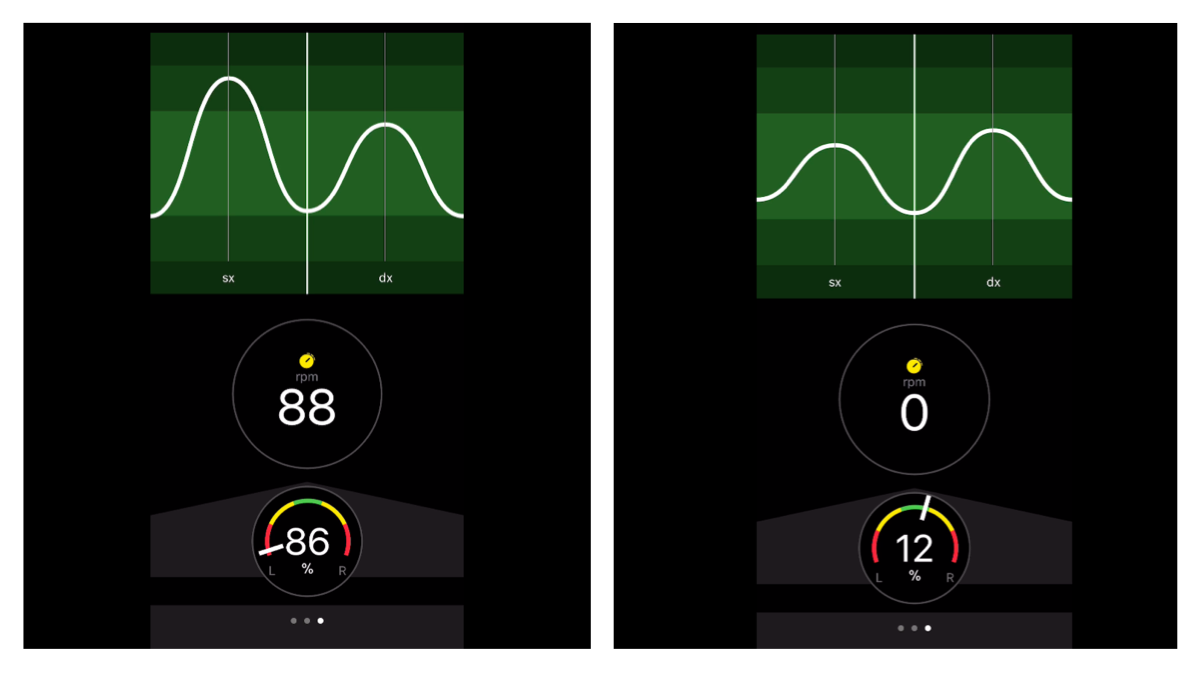
I did some single leg pedaling to test it out, and when pedaling with my left leg, the indicator moved all the way to the left showing I was generating most of my power from the left side. However, when I switched to my right leg, the indicator got all confused and was showing only 12% more power coming from my right leg and the RPM went to zero which kind of makes sense since the optical sensor is placed on the left side.
So similar to a lot of powermeters currently in the market, MyCycling measures cadence and power from the left side only and provides you with an estimate. There is nothing wrong with that method and in all honesty, I haven’t seen any scientific benefits to trying to achieve a perfect pedal stroke. But if you like to see that data and try to perfect your pedaling then it is there for you.
NOISE

MyCycling isn’t silent. Actually, it’s a bit noisy. Very similar to the KICKR 2016 and louder than the 2017 version. MyCycling uses the same belt system as the KICKR and has an identical noise. If you just listen to the noise, you will think it’s a Wahoo KICKR.
However, a lot of factors play into the noise in the room, such as furniture, soundproofing in your house, etc. I didn’t feel any vibration coming from the trainer. However, if you live in an apartment, make sure you get a decent trainer mat to help reduce the noise.
You can listen to the trainer in the video on top of this post or you can check out the YouTube video here.
FINAL THOUGHTS
TechnoGym has been creating top-quality wellness equipment since 1983. From treadmills to heavy weight lifting equipment, millions of people use their products on a daily basis. When I saw their MyCycling trainer, I was a little skeptical. I have seen a good share number of bike trainers from companies that have been in this market a lot longer and only end up in disappointment.
It is refreshing to see a first generational product that doesn’t only look good, but it’s well made, accurate, and performs as you would expect. MyCycling trainer comes with a cassette installed and was easy to setup and get going. They also include a phone mount and a polystyrene carry case.
So, would I recommend it? Well, that depends on your needs. If you are looking for a trainer that is accurate, looks good, don’t mind a little noise, only plan on using Zwift with Bluetooth, or TechnoGym’s MyCycling Training app and willing to spend over $2000, then I would say go for it and you won’t be disappointed.
Also, some might want to stay within the TechnoGym’s eco-system and might find their MyCycling app, TNT (Technogym Neuromuscular Training™) training, and coaching services beneficial. So paying that price can be justified. You can get coaching services through the MyCycling app and prices vary depending on program and coaching you are interested in. I usually keep my reviews limited with mainstream cycling apps such as Zwift, TrainerRoad, The Sufferfest, etc.
TechnoGym created a very good product here. However, at $2,150, I just don’t see a big market. You can spend $1000 less and get as good of a bike trainer if not better. It might not be an eye candy that you can display in your living room, but you know it works and is compatible with the majority of cycling apps and bike computers available today.
MyCycling smart trainer has the potential to make a big dent in this market. However, for this to happen, TechnoGym need to release control of the trainer and make it ANT+ FE-C or (FTMS) and Smart Bluetooth compatible so it can communicate with third-party apps and devices. Also, the price needs to come down and place it between $1,200-$1,400. The Tacx NEO is currently the highest priced trainer but it does offer a little bit more features and very quiet which is a big plus.
WHERE TO BUY
MyCycling is currently available through TechnoGym certified dealers. You can search for a close one using their website here. You can also purchase the trainer online from their website here.
TRAINER COMPARISON
wpDataTable with provided ID not found!-
Frame & Design
-
Ease Of Setup
-
Smart Connections & Compatibility
-
Accuracy
-
Responsiveness
-
Noise Level
-
Road Feel