
Your new bike trainer finally arrived and you’re eager to start using it. However, unlike your old classic trainer, smart trainers offer a little more as far as technology and fun things to do. Getting it setup and connected at first, can be a little intimidating and confusing.
In this guide, I will walk you through how to set up your new bike trainer. I will be using the Wahoo KICKR as an example and connect it to Zwift and TrainerRoad.
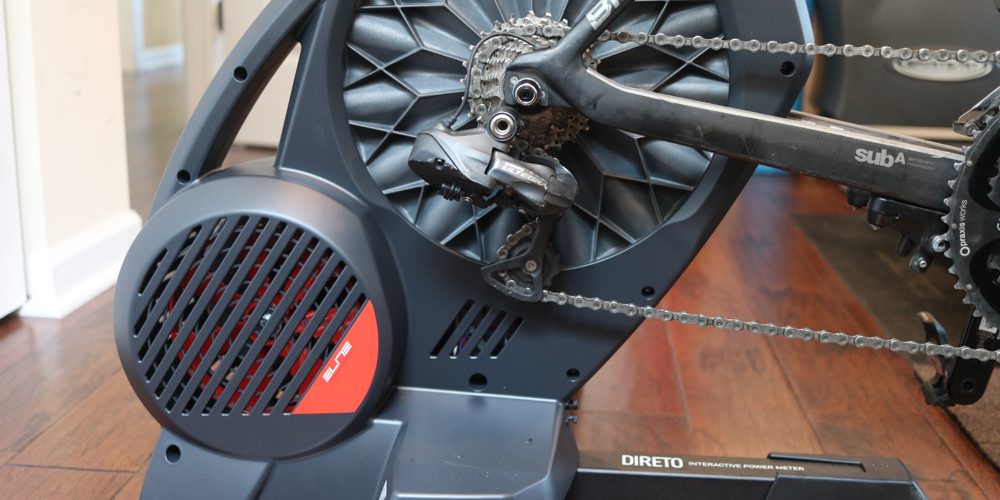
The KICKR is a direct-drive indoor trainer, which means, the rear wheel comes off and the bike is then affixed directly on the trainer. However, the steps are usually the same for other trainers except for wheel-on trainers, like the KICKR Snap or CycleOps Magnus, you don’t have to worry about removing the rear wheel or cassettes.
THINGS YOU NEED
Before you start, you need to have the following to get you started:
- Your new smart bike trainer
- A smartphone or a tablet
- ANT+ Dongle: This is a little USB dongle that you need to connect to your computer. I recommend the Garmin USB ANT+.
SETTING UP THE TRAINER
Once you get the trainer out of the box, you will need to set it up on a leveled floor and adjust the feet if needed. Luckily, the KICKR comes with an 11-speed cassette installed, so you don’t have to worry about installing a cassette unless you need to switch it for something else.
If you need to install a cassette, I highly recommend:
Once the proper cassette is installed. You are ready to setup your trainer:
- Connect your new trainer to a power source.
- Download your trainer app. In this example, we are using the Wahoo KICKR, so you will need to download the Wahoo Fitness app on your smartphone. The app is available for Android and iOS
- Pair the KICKR to your phone: Go to “Sensors” and you should see your KICKR listed there. Click on it and it should pair.
FIRMWARE UPDATE
Once the KICKR is paired, Wahoo will check for a new firmware. Follow the instructions and make sure to run the firmware update. This step doesn’t take long and will ensure you have the latest and greatest update installed.
CALIBRATE YOUR TRAINER
The calibration process is simple for the KICKR. It is used to determine the power required to overcome friction in the bearings and belt on your KICKR to give you more accurate power. It is not necessary to do a spin down before every ride. However, it is recommended to do one if you transport your KICKR or every two weeks.
Some trainers don’t require calibration like the Tacx NEO or Elite Drivo.
To calibrate your Wahoo KICKR, start pedaling for about 10 minutes and let the trainer warm up. Login to the Wahoo Fitness App, under Sensors, select your KICKR, then click on Spindown. You will need to accelerate to 22.36 mph slowly, then stop pedaling, and let the KICKR coast down until the spin down complete.
For your first calibration, I highly recommend doing the Advanced calibration. By default, the advanced calibration option is not displayed in the app. Tap the text box above the PERFORM SPINDOWN many times until you see the PERFORM ADVANCED SPINDOWN option. Click on it and follow the instrucitons.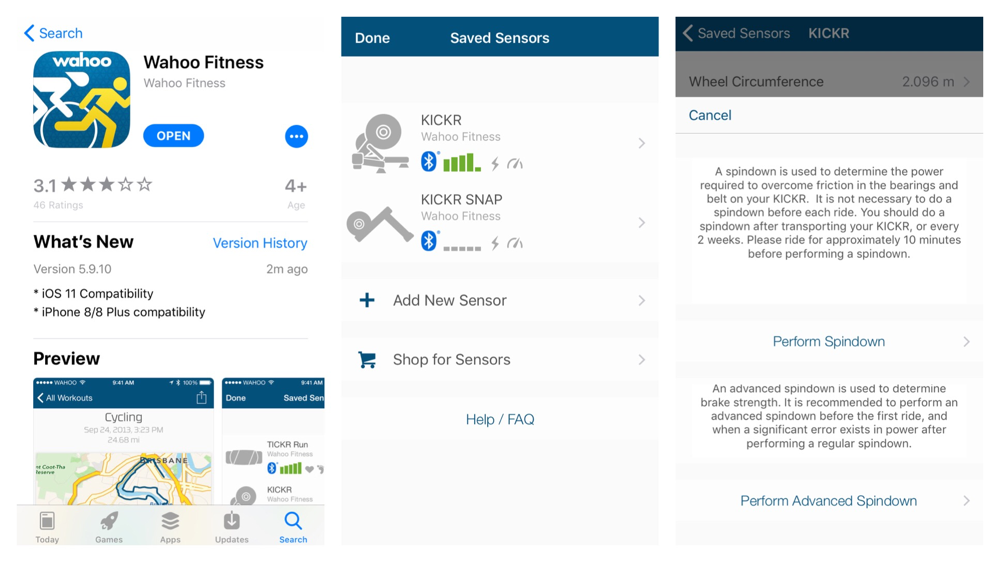
OPTIONAL STEP: CONTROL YOUR WAHOO KICKR WITH ANT+ POWER METER:
This step is optional and only applicable if you own a power meter and a KICKR. If you don’t, then feel free to skip to the next section.
Basically, this allows your Wahoo KICKR to use your bike power meter to control resistance.
To do this, you need to add your power meter to “Sensors”, open the Wahoo Fitness App, click on sensors, and click on “add new sensor.” You need to have ANT+ bridge or ANT+ key connected to your phone if your power meter is ANT+ compatible only. Once your power meter is found, then click on add.
Then Go back to Saved Sensors, and turn on “Control w/ANT+ Power Device”.

ZWIFT SETUP
To get started with Zwift, first, you need to download the Zwift software to your computer. Once installed create an account and log in.
Wahoo KICKR should pair with Zwift if Bluetooth is enabled on your computer. However, if your computer isn’t Bluetooth ready, or if you experience issues pairing to your KICKR, then I recommend getting the ANT+ dongle and use ANT+ protocol to connect to the KICKR.
- Launch Zwift app on your device and login
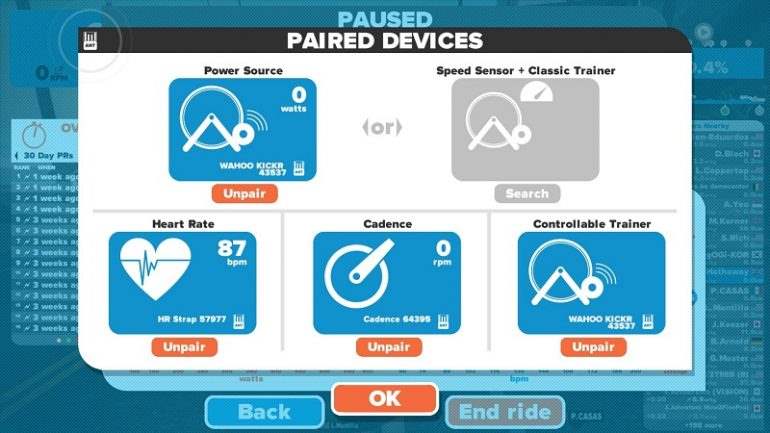
- PAIRED DEVICES menu should come up like the one you see below
- Click on “PAIR” under “CONTROLLABLE TRAINER” and select your Wahoo KICKR
- Do the same for Power Source, Cadence (optional), and Heart Rate (optional).
Your PAIRED DEVICES screen should look something like this:
You can also download Zwift Mobile Link for your phone, available in the iOS App Store and Google Play. With the Zwift app, you will have a lot of options to enjoy and control your Zwift experience.

Now you are ready to enjoy your new smart trainer. You can use Zwift to do a free ride, do a challenge, ride with friends, find a group ride, do a race, or create a custom workout. Zwift should be able to control your smart trainer and adjust resistance based on target gradient or target power.
TrainerRoad SETUP
TrainerRoad is another great option. It offers a huge library of power based cycling workouts. Once you are setup and running with TrainerRoad, you will need to set your FTP (Functional Threshold Power). Then you can browse through hundreds of workouts or create your own via TrainerRoad Workout Creator. You can also follow one of their structured training plans to properly prepare for a cycling or triathlon event.
To pair TrainerRoad to your Smart Trainer, create an account at TrainerRoad.com. Once your account is setup, then download the iOS or Android App. You can also download the desktop application.
Below, I will walk you through TrainerRoad setup in iOS. The setup is very similar to Android and the desktop version.
Pair Your Smart Trainer To TrainerRoad App
- Make sure your phone’s Bluetooth 4.0/ANT+ (for the KICKR, you only need Bluetooth) is enabled and your trainer is plugged in and awake
- Go to Devices and you should see your smart trainer, tap the KICKR and the pairing process will start. Once completed, you should see the gray square on the right turn green.
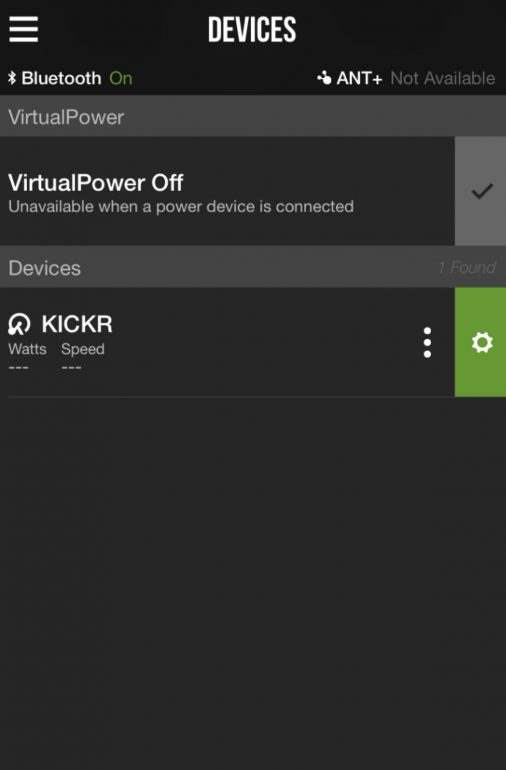
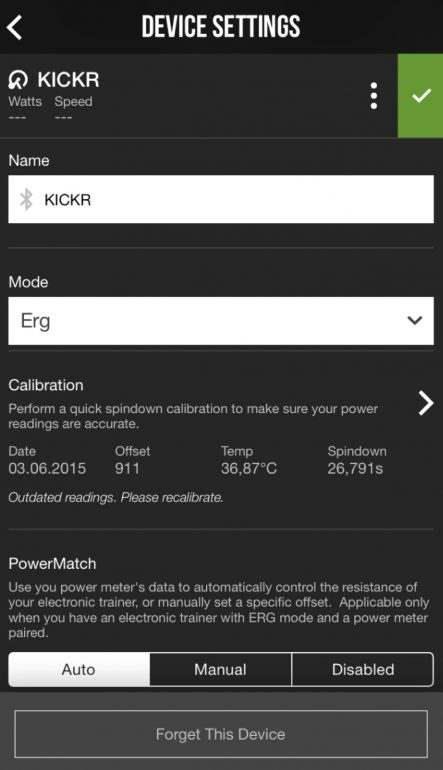
- Tap the KICKR once more to open the Device Settings screen. In this screen, you can change the name, select the workout mode, do power match and do a spindown calibration.
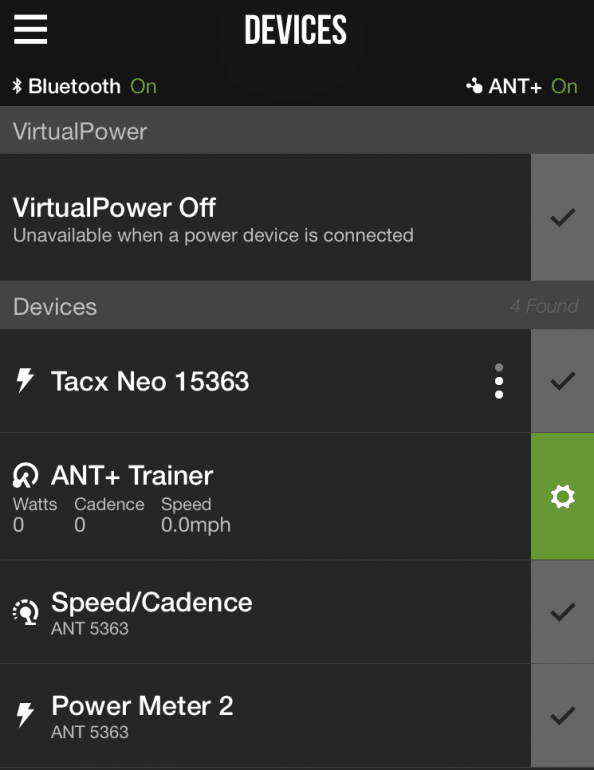
Here is an example pairing Tacx NEO with TrainerRoad. TrainerRoad will list Tacx NEO under devices
Now you are ready to start using your bike trainer. Please feel free to connect in the comment section if you have any question.
Enjoy!